Installation
To install the Midi Remote Script, follow the steps listed below:
- Download the latest release of the script from the Github repository. There will be a
.zipfile located in the releases section. - Extract the zip file to your
Ableton \ User Library\ Remote Scriptsfolder. This will be different for MAC and Windows users but is normally found in theDocumentsfolder on Windows, and the Music folder on MAC.- Mac:
/Users/[username]/Music/Ableton/User LIbrary/Remote Scripts - Win:
C:\Users\brand\Documents\Ableton\User Library\Remote Scripts - When extracting this, make sure to place it in a top level folder with the name
MPC_Studio_Mk2. This will be the name that appears inside Ableton live when we select the control surface.
- Mac:
- This is the directory structure that should be in place after unzipping:
Ableton/
|- User Library/
     |- Remote Scripts/
          |- MPC_Studio_Mk2/
              |- __init__.py
              |- v10/
              |- v11/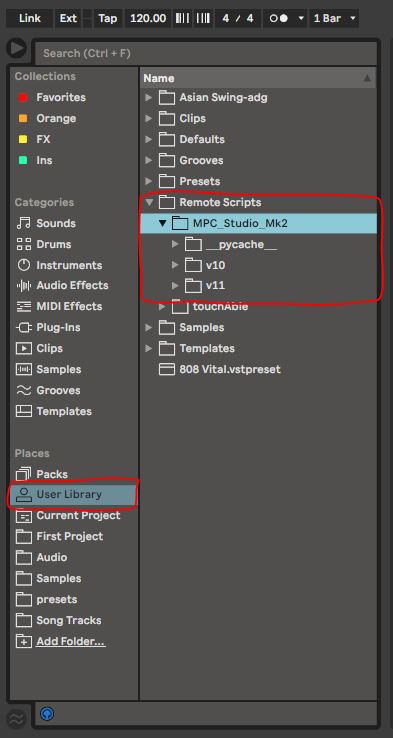
- After extracting the zip file, open Ableton Live to connect the Script to the controller
- Navigation to the following menu location.
- Windows:
Options -> Preferences -> Midi - Mac:
Live -> Preferences -> Midi
- Windows:
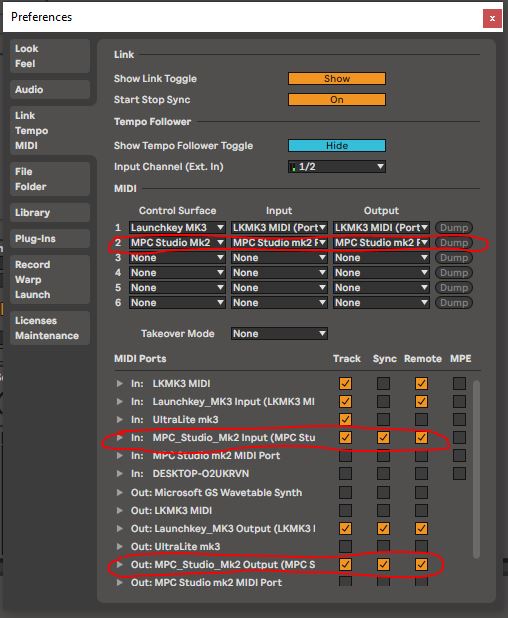
- On the Midi Tab, you will see dropdown boxes with various control surfaces listed. You can have more than one control surface operating Live at any given time.
- On the first empty dropdown box, select the
MPC Studio Mk2option. If you do not see it listed here, verify that you complete the previous steps correctly. - For the adjacent input and output dropdown boxes, select the public MIDI port for your MPC Studio Mk2. The Private port will not work
- On the first empty dropdown box, select the
- Below the dropdown boxes, you will see all midi ports listed with
Track, Sync, Remoteoptions.- Find the public IN and OUT midi ports for the MPC Studio MK2.
- Make sure that Track and Sync is selected for both In and Out.
- Close the preferences.
- Navigation to the following menu location.
- Once the connection has been made, you should see the buttons and pads on the controller light up. If this is the case, you are finished, Enjoy! If not, repeat the above steps again to make sure it is installed correctly.
For information about getting the LCD Display to work, look here.